Showing posts with label Show and Tell. Show all posts

Saturday, October 6, 2012

What I've Been Up To This Summer...

Hey Y'all!

I just wanted to drop in and give you a little shout out. :-) I'm battling with feelings of guilt over how I have neglected this blog this year. I hate that. But, life has just thrown a lot at me during this season it seems, and something's gotta give. I hope it won't be this way for long. 

Let's see if I can give you a short synopsis of what I've been up to this year, shall we?

1) Of course, you know that I started PURE YANKABILLY All Natural Skincare. Y'all I had NO idea how consuming setting up a business would be. It's not just making product... Now, Etsy has had some policy changes which aren't conducive for shops like mine. So, I will be creating my own website for PURE YANKABILLY here shortly. One more thing to add to the list. :-) I'll let you know when it's up and running. I'm really enjoying myself with this business endeavor, but it takes a lot of time.

2) We managed to sneak in a long-weekend away this summer. We were supposed to go to West Virginia for a family reunion, but that was when those terrible storms rolled through and left everyone without power, food, gas, etc. I was pretty bummed because I haven't seen most of that side of my family in 20 years. I haven't seen my beloved mountains in longer than that. But, evidently it wasn't meant to be. I was just happy that all of my family was safe and unharmed. En leu of WV, my family stole a weekend get-a-way to one of our favorite places here in Indiana. This is when it was 107 degrees, so most of our time was spent hanging out in the hotel room. Lord, it was a hot summer! It was hotter here than any summer we lived in Florida. What's up with that? But, I digress...

3) Me and the man-child also spent a week with family in Michigan before school started so he could log some family time. That's very important. Family.

4) As soon as we got home from Michigan, tomatoes were begging to be canned. Lots and lots of tomatoes. We'd already worked the green beans and squash 'til it was coming out our ears beforehand. The garden is always a LOT of work in the summer. Actually, we have more peppers to work today. But, it's very rewarding work that makes me smile every time I'm eating food that we have grown well into winter. Definitely worth it.

5) School started the day after Labor Day for us. Which meant Homeschool Group also started. This year I'm teaching two classes, which I'm having a blast in. It also means that I have to study and be prepared. 

6) My husband was rear-ended four years ago at full speed. It left him with injuries that unless a miracle takes place, he'll carry with him for the rest of his life. We're believing for the miracle! Anyway, he sought an attorney to help him with getting worker's comp to cooperate a few years ago. Long story short...it went to trial. The trial was a week and a half ago. That was pretty much all-consuming leading up to the big days. Lots of visits with attorneys and prep work. Life went on hold during that period. Thank God, it's done and over with. That chapter is closed and we can move on. And, thank God they ruled in our favor. 

Now, that the trial is over and we are back into a school-year routine, I'm hoping to be able to pop in more frequently here. Of course, there is still life - which includes trying to get the business firing on all cylinders. But, hopefully I'll find my groove again.

In the meantime I want to leave you with a few photos of what we've got going in my neck of the woods. I'm really excited about it!


We're getting a windmill farm!
These things are huge and impressive.


The base. My husband is 6'1".


The engine that holds the propellers. Did I mention that my husband is 6'1"?


The propeller blades attached to the engine thingy.


One of the 3 lengths of the base and the part that holds the propeller blades on a semi.


I could only get 2 of them in my lens at a time. And, this in no way does them justice. The base of each one is 300' tall and they stand 490' at the top of the propellers. There are a lot more of them up now than when I took this picture. So, I'll try and get a better shot to share with you again sometime. There are going to be 125 windmills when it's all said and done. It's one of the most amazing things I've ever seen - watching them spring up everywhere. 

I'm glad to see a renewable energy source becoming an important part of my community.

Alright, y'all...I'm outta here. 

Until next time...
Pam

Thursday, May 24, 2012

My First Foray Into Wild Edibles

Every year when we put out our garden there is this certain weed that absolutely wants to take over. Last year we put straw down, which made a remarkable difference. We are going to do the same this year - probably this weekend. My husband has tilled in between the rows in the meantime to keep the weeds under control. But, this weed is still cropping up in the rows where our veggies are growing.

Then, a few days ago I  read this blog post from New Life on a Homestead about a common garden weed. MY common garden weed. Turns out that it isn't a weed after all. It's actually a super food called purslane. Go figure. 

I'm starting to realize that many of the plants that we consider weeds are actually some of the most nutritious foods on the planet. 


Take the lowly dandelion, for instance. That little plant is the nemesis of every man who desires a green lawn in the nation. But, it's actually very good for food. It's leaves can be eaten raw in salads or cooked many different ways. It's roots can be roasted and ground up and brewed as coffee. The flowers are also edible and are supposed to be a favorite when battered and fried. Though I've never eaten (or drank) it, I hear it is really yummy. It's also a powerhouse of nutrition that is fantastic for your liver, among other things.

But, we're talking about purslane today...


(from plantphotos.net)

This is what www.plant.photos.net says about purslane:

...also called Summer Purslane - purslane usually grows spread out flat on the ground. It can be found growing in almost any unshaded area, including flower beds, corn fields, and waste places. Purslane can be found growing in cold climate areas (e.g., Canada) as well as warm areas (e.g., the Caribbean).
Medicinal Uses:

Verdolaga is also valued in Latin America for its medicinal properties. Purslane contains more Omega-3 fatty acids than any other leafy vegetable plants, and may have positive effects on the brain and may aid in such conditions as depression, bipolar disorder, Alzheimer's disease, autism, schizophrenia, attention deficit disorder, hyperactivity and migraines. For other medicinal uses see: http://www.ansci.cornell.edu/plants/medicinal/portula.html#efficacy

American Indians used the plant as a poultice for burns, juice for earaches, tea for headaches and stomachaches.

Pretty cool, eh?

It's also an excellent source of vitamins A, C and E and the essential amino acids. So, I figured that I needed to try this wonder food. Crab cakes were on the menu for the night and I don't have any of the parsley that I usually put in it, yet. So, I thought it would be a great night to try the purslane. I went out the garden and pulled some of it, washed it really well in water and then spun it dry in my salad spinner.  


Since it can be eaten cooked or raw, I tasted one of the leaves. It has a very mild, but tasty flavor. It is supposed to be very similar in taste and consistency to watercress, but I've never eaten it so I can't vouch for that fact.
For my crab cakes, I simply cut the roots off and added the amount I needed to the food processor, stems and all. They're edible, too. Next, I added the rest of my ingredients to the food processor to finish chopping and mixing everything together.

Evidently, purslane is also a very popular salad green in Europe. Considering we were having salad with our dinner (and I've been buying the el cheapo bagged iceberg lettuce lately) I picked off the leaves of some more of my purslane and added to the salad mix to bump up the nutritional value of my otherwise pretty nutritionless bagged salad.


Not only is it tasty, but it's pretty, too. :-)


All in all, I really liked the purslane and will definitely use it again.
You probably realize this, but I'm going to mention it anyway. Don't eat wild edibles from places that are likely to have been sprayed with pesticides or that grow too close to the road where they would be covered in exhaust fumes. I felt confident using the purslane from my garden because we don't spray. We've actually found that our garden seems to do better than most people's in our area and I think it's because we leave it alone and try to build the soil quality every year. Healthy soil makes for healthy plants.
I'm amazed at how many wild edibles that we have around us and are clueless about. I would really like to start learning more about them. It just so happens that Wild Cards is a deck of cards that has pictures and information on 52 different wild plants that you can eat. It includes information on where each plant is found, how to cook it and its medicinal uses. I really need to get one of those decks.
So, tell me - have you ever eaten weeds?

I'm sharing this post with Wildcrafting Wednesday.

* UPDATE: I have had a couple of people tell me that the link to the Wild Cards took them to an, um, unsavory website. I apologize for that. On my Mac it took me right where it was supposed to. In an effort to fix the problem I changed the link. Please, let me know if it is still not working right and I will just remove it altogether and you can just google it for yourself. ;-) Thanks, y'all!

Thursday, April 5, 2012

Making Homemade Beef Stock

My family bought half of a grass-fed cow this winter. I asked the processing plant for the bones and any extras they had. Now, I'm a veteran at making homemade chicken stock, but this was to be my first foray into beef stock. We put the huge bag of bones into the freezer to wait until I had room in the freezer to make stock. You see, we also bought a pastured hog that came in about 6 weeks before the beef did. That meant my freezer was full. to. the. max. Since, I had 200 thousand pounds of bones, I was going to need to freeze the resulting stock so it wouldn't spoil. Of course that was going to take up precious freezer space that I just didn't have until we ate some more meat.


When I knew that time was getting close for me to make stock we took the big bag of bones out of the freezer and set it on the garage floor to wait for me. I live in Indiana and it was winter time so this should have been no problem. Clue in on key word should. Let me rephrase...In a typical winter this should not have been a problem. Clue in on key words typical winter. In case you just flew in from Mars or something...this has NOT been a typical winter. No. We had to have a warm snap. Like, even warmer than our unusually warm winter snap. I couldn't get those bones out of the garage before they quickly spoiled because of the heat. GRRRRRR! Needless to say, I was NOT a happy camper. Lesson learned...


I still wanted to make beef stock, though. Bone broth is one of the healthiest foods you can consume and I am over buying an inferior product if I don't have to. Guess what I found out? You can actually buy the bones from a butcher many times. Meijers (a superstore in the Midwest) even sells them. So, I bought me some bones and made beef stock. Wanna learn?


First, you need to get some bones. I started by saving all the beef bones that came in our roasts and off of our steaks in a gallon sized bag in the freezer.


Then, I bought some soup bones at Whole Foods.


And last, but not least...I snatched up this baby to throw in for good measure. :0)


It's a cow hoof. The hard part has been taken off and it's been cleaned, of course.


I thought you might like a close up. You're welcome. :) These are really great for making stock because they're full of the substance which causes stock to gel. You want that. It's super good for your joints as well as your immune system.


I think I freaked the lady out behind me in the check-out lane at Meijers when she saw this on the conveyor belt. Our conversation went something like this...


- Excuse me, what is that?
- A cow hoof.
- What are you going to do with it?
- Make dinner.
- voice begins to raise... Exactly WHAT are you making with it?
- voice remains calm and nonchalant... Braised cow hooves with liver meatballs. It's cooked with lots of garlic and onions, which makes everything taste wonderful. It's really good for you.
- voice is near panicky and about 5 octaves higher... OH. MY. GAAAWD! How can you EAT that?


Naw, I didn't really say that to her. But, I totally would have if I was on-the-spot witty. Unfortunately, I usually come up with some real zingers, but it's always after the fact. :) This is how our conversation really went...


- Excuse me, what is that?
- A cow hoof.
- What are you going to do with it?
- Make beef stock.
- Oh?
- Yeah, they're great for making stock because they produce a lot of the gel that is so good for building your immune system and joints.
- Well, that makes sense. I just wouldn't want to see one show up on my dinner plate!


It wasn't until I hit the parking lot that I realized I could have had a really great time messing with her. Oh well, there's always next time. :)


You probably want to know how to finish making stock now so I'll get off of my bunny trail.


After I gathered all of my respective bones, I put them in my favorite 9 quart iron Dutch oven. I give you permission to use whatever you want, though. I'm nice that way. Then I added some flavor and nutrient enhancers.


This part is really flexible, but I added carrots, onions and garlic. They make the broth taste yummy and give a real boost to the immune system. I also added bay leaves, because bay leaves make everything taste better. The dried stuff you see in the picture is parsley from last year's herb garden. If you ever plan on planting parsley in your herb garden make sure to get the Italian parsley. Don't even bother with the curly stuff - unless you like to put a snippet of it on the side of your dinner plates for everyone to throw away. Then, by all means, knock yourself out. I won't judge you. Anyhoo...I also added sea salt and pepper for good measure. As far as flexibility goes, you can throw in celery, leafy greens like kale or collards, any herb you have on hand (think thyme, chives, sage...), the occasional potato peel, etc. I've even been known to throw in a few asparagus stems, though you would want to go easy on that. They have a pretty strong flavor when cooked for a long time and can quickly overwhelm the broth. You want the main flavor to be the animal the bones came from, not asparagus. Know what I mean?


A quick tip if you're going to start making bone broth, beef or chicken, is this: If you're going to peel carrots for something, wash them first and then save the peels in a zip lock bag in the freezer. You can also save onion and garlic skins, the tips of celery or the ends of any veggie that you would normally send to the trash or compost bin as long as you wash them first. This also applies to the stems of soft herbs. Then, when your bag of frozen veggie scraps is full just add it to your bones for broth. The scraps are still full of nutrients and flavor. Even though they're not fit for showcasing in a meal they're perfect for making broth and you didn't have to waste a vegetable in the meantime.


Here's another quick tip for you. Don't mess with peeling and chopping the garlic. I simply smash them with the side of knife and throw them into the pot skins and all. I KNOW.. so much easier! You're welcome.


Once you've decided on add-ins, or not, just cover with water. I mean...JUST. You don't want inches of water over the tops of your bones 'n veggies. Kapeesh?


Now, this next step is optional but highly recommended. Add 1 or 2 tablespoons of cider vinegar to the water and let it sit for about 30 minutes before you turn the heat on. The cider vinegar begins to break down the bones so that inner substance that forms the gel that is so good for you can be released.


After about 30 minutes turn the heat on medium high and bring to a boil. Skim off any foam that forms and then turn the heat down to med low. Cover your pot. You want a gently bubbling simmer, not a boil. That's it! 


Don't let the details of this post fool you. It takes mere minutes of hands-on time to get to this point. From here on out you barely even have to think about your broth, much less touch it. So, though there is a lot of time involved, there is very little hands on time involved. It's brainless, really. And...it smells SO GOOD your husband will go nuts when he gets home from work. I'm talkin' 'wake you up in the night 'cause it smells so good' good here. Moving on...


Ideally you want to let your stock simmer for 24 hours before you strain it. But, you can let it go even longer if you like. I wouldn't strain beef stock any sooner than 18 hours, personally. Chicken stock can be removed after 8 or 12 hours if you need to. The beautiful thing about making your own stock is that you can make it in a crock pot if you're uncomfortable with running your stove top for that long at a time.


Another tid bit of information is that your bones can be reused. Remove the veggies after each batch if you're using them. Chicken bones can be used 2 or 3 times. Beef bones can be reused up to 5 times. Now, each batch of broth is going to be weaker than the one before. The first batch of stock is superb, unequaled to store bought even, and is best used where the flavor is going to be featured. Think soups, sauces, etc. The later batches which are less flavorful are great for cooking anything that would normally just use water. Think rice, risotto, steaming veggies, yada, yada, yada. Although you don't get the awesome flavor, you're still getting extra nutrients.


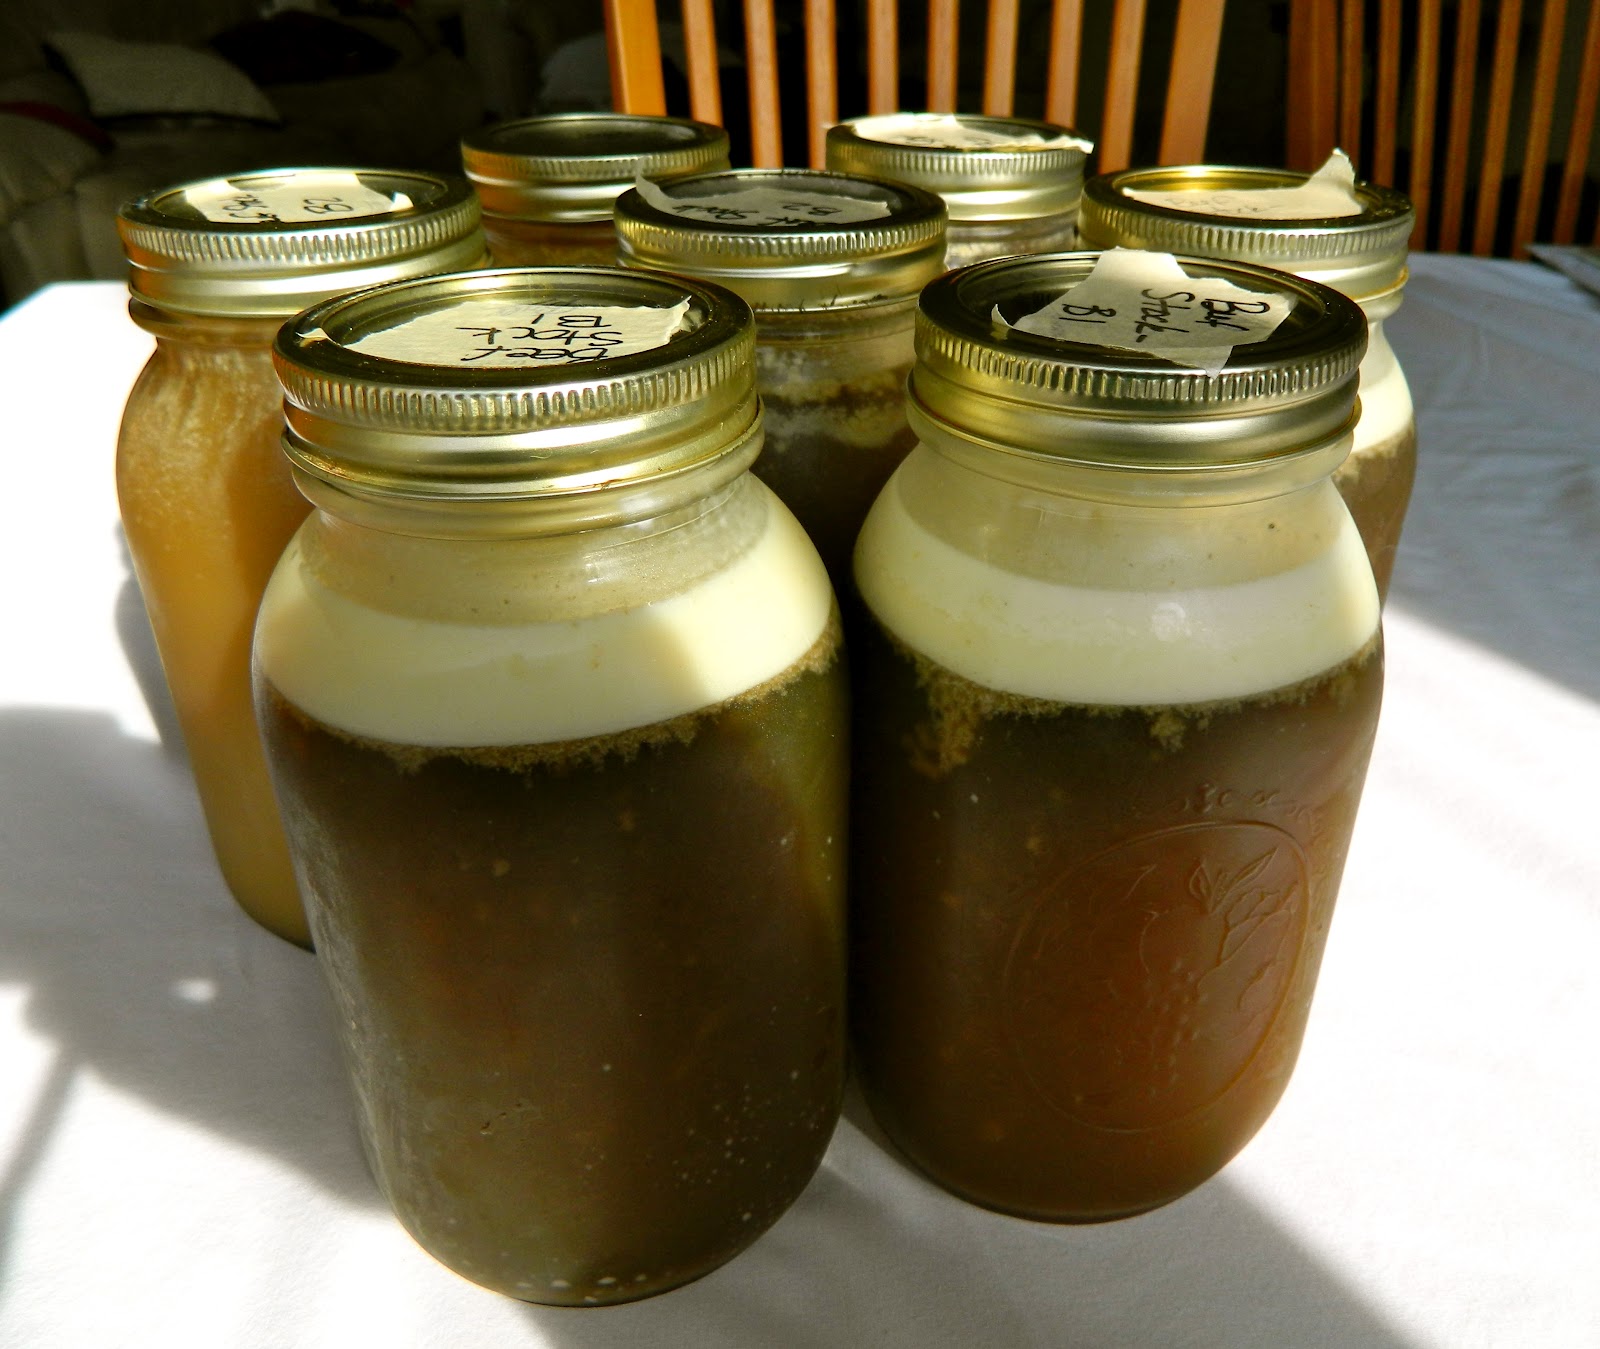
When my stock was done, I poured it into mason jars through a cheesecloth.


Once it's cool the fat will rise to the top. You can scoop it off if you wish. Or, you can scoop it off and save it separately to use in cooking because what you have there is tallow - a traditional, healthy fat. You can see that the jars in the back look different than the jars in the front. They don't have that dark, rich color because they were from a later batch of beef stock. It'll be perfect for cooking rice or something like that in.  


All in all, I ended up with 7 quarts of beef stock. I can live with that. :0 I'm not lying when I tell you that the flavor of store bought broth in no way, shape or form comes anywhere near the flavor of homemade stock. The difference it makes in the flavor of your meals will amaze you once you try it.


You can go here for a tutorial on how to make chicken stock and a few more tips about packaging and storing broth in general.


So, do tell...Have you ever made your own stock before? Is this something you think you would ever do? Any more ideas on what to do with the later batches of stock that don't have as rich of a flavor?

Friday, March 16, 2012

Cute Etsy Find

Let's talk about checkbook covers today. How'd that be? Do any of you use the cheap, crappy little vinyl ones that you get when you order your checks? I do. Because I'm cheap frugal. Back years ago, like before I gave birth or had a yungun' cut out of me or however you prefer to phrase it, I worked at a bank. Do you know that we actually had three color choices for those cheap, crappy little vinyl checkbook covers then? Yes'm we did. Navy, green and red. Now, I guess the cheap, crappy little vinyl checkbook cover companies are experiencing a financial crises where they can't afford green and red pigment or something, because we aren't given color options anymore. The cheap, crappy little vinyl checkbook covers only come in navy blue.


Don't get me wrong...it's not that I really care. It's not one of those life-altering experiences. I don't get bummed when I open my new box of checks and SURPRISE! I get another cheap, crappy little vinyl checkbook cover in navy blue or anything. I think I might actually sew a bunch of them together and make a tablecloth or matching bra and pantie set out of them or something. But, I digress...


Ever since I opened a business account and carry two checkbooks with me, this single color option has been an oh-so-slight pain in the neck. I don't want to take 3 seconds to get the right checkbook when it used to only take me 1 second. Do you feel me? So, I figured I needed to find another checkbook cover. So I thunk and I thunk and then I thunk some more about where I could find another one. And...then it hit me. Duh! Etsy! Y'all, they have everything on that site. I'm pretty sure that if you can think it up, you can probably find someone who makes and sells it on Etsy.


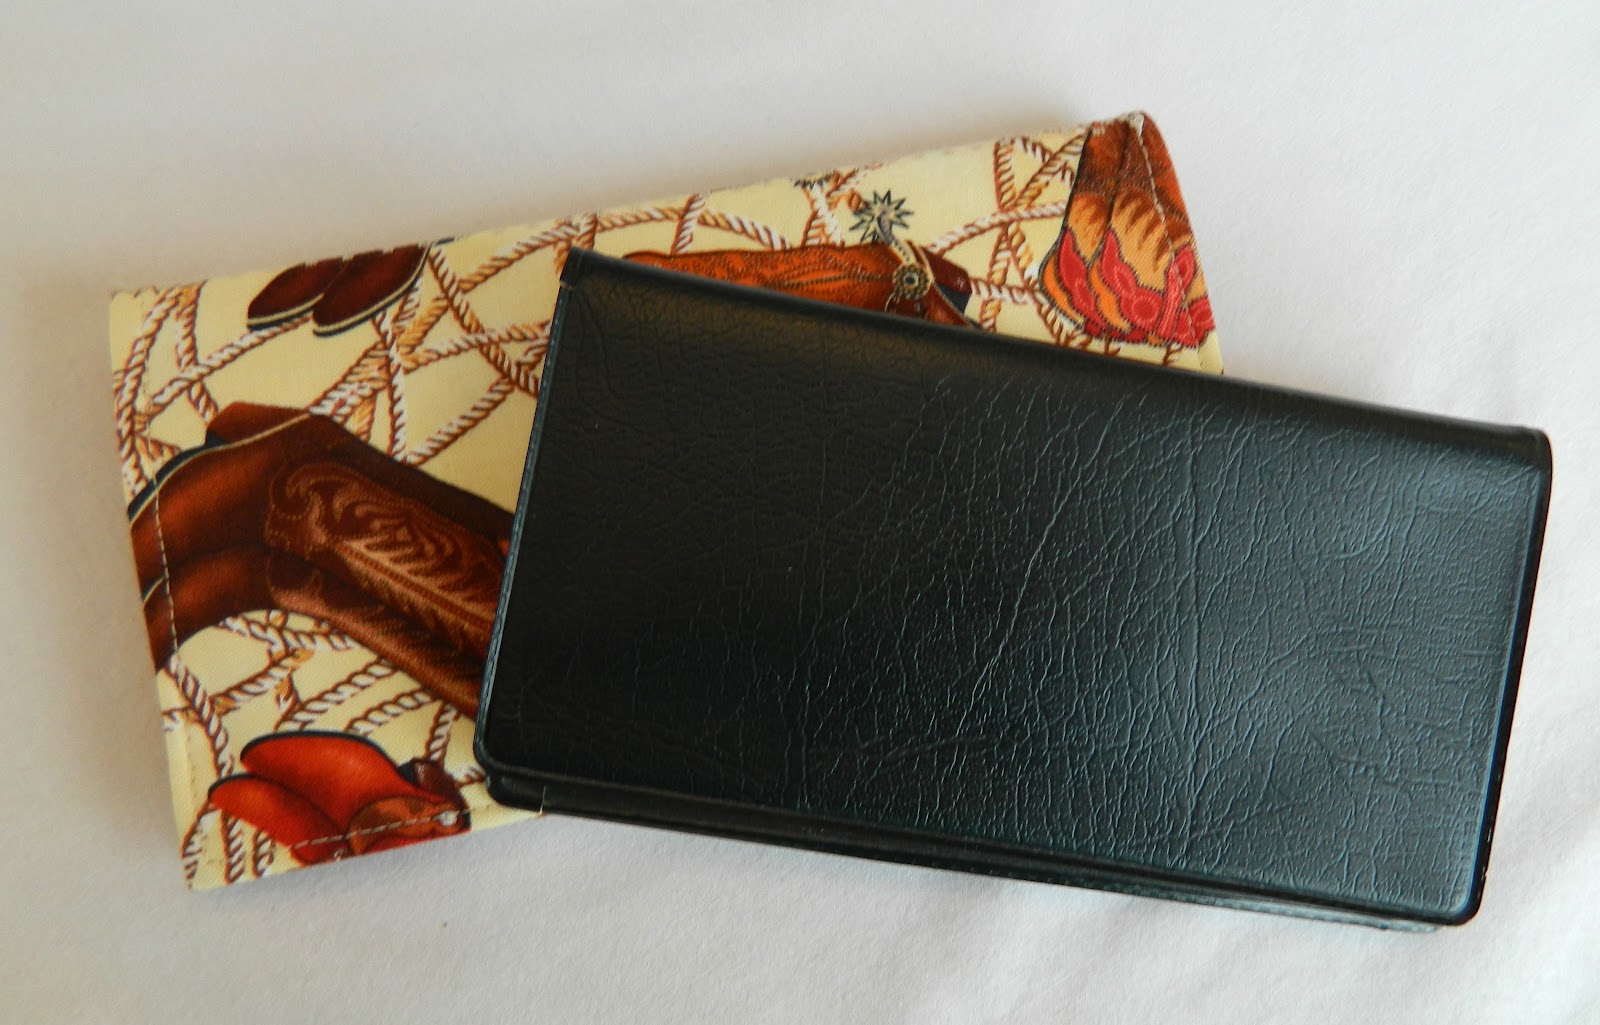
Since my shop is PURE YANKABILLY, I really wanted to find something that had a western feel or cowboy boots. I'm a duplicate check kind of gal, so it was important to me that there be a plastic insert to go between the checks. Look what I found!


Here's a shot of the inside...


It has a place for my register and a plastic piece sewn in for the duplicates. And, it has a cute contrasting fabric on the inside.


I purchased this through a shop called Every Stitch. It was less than $10 and shipped out the same day I purchased it. I saw so many cute covers, though, that had I not had something specific in mind, I would've had a hard time choosing. Prices range anywhere from $5 up, depending on what type of material you prefer.


Now, when I see this in my purse...


I'm back to fishing out the right checkbook in one second flat. That makes me smile. :0)


So, share with me...have you ever purchased anything from Etsy? We're you looking for something specific or just window shopping?


Don't forget, you still have time to enter the giveaway for over $60 in PURE YANKABILLY products!

Monday, January 30, 2012

Rendering Tallow


Well, I finally got a huge job that had been looming large over my head finished. I got all the fat from the 1/2 side of grass-fed beef that we bought rendered into tallow. It amazes that 1/2 of an entire cow only had six and a half quarts of fat on it. 


I basically followed the same procedure as when I rendered lard a couple of months ago, except I did it in a bit lazier way. Instead of chopping all of the fat into 1" pieces, I simply put the slabs of fat into my containers whole. They were pretty large and I just didn't have space to chop it.


Both crock pots and my 9 quart Dutch oven were completely full of beef fat. I set both crock pots and the burner on my stove to low and let them be.


As the fat began to melt, I strained it into quart jars through a cheese cloth. Eventually I was able to add the fat from the red crock pot to the Dutch oven to save counter space.


These pictures show the liquefied fat during the melting process. This is what I pulled out with a ladle and strained into jars. I kept at this until there was no more fat to be rendered.


The fat in the crock pot was finished first. Here you can see the hard bits left over after the fat was completely liquefied. I need to mention that this makes your house smell like heaven while it's cooking. The bits of meat that are left on the slabs of fat when the cow is butchered are irresistible to certain meat-loving husbands, too. :0)


The Dutch oven still had a way to go by the time the crock pot was finished. This could have been because it was so much larger. I actually preferred this pot because the cast iron is wonderful at holding in heat evenly, allowing me to use a lower temperature to render the tallow. This is preferable, in my opinion.  


All in all, it took 3 days for all of the fat to be rendered into tallow. There was very little I had to do during that time, besides occasionally ladling the fat into jars. It may have taken less time had I cut the fat into smaller pieces before I started. Since I didn't really have room for that and wouldn't have to touch it much while it was working it's magic anyway, I just didn't see the need for that extra step.


Now I have six and a half beautiful quarts of a traditional, healthy fat to cook with in addition to the lard I have left. Although, this took a long time - it took very little effort.  Even the clean-up was a breeze. After I emptied each crock pot and the Dutch oven, I filled them with water and let the water heat in them for a while. This pulled almost all of the fat residue off the sides and bottoms of the pots. I then dumped the water and washed as usual. There was no problem with bits and pieces stubbornly sticking to it.


Traditionally, tallow was used in soap-making and for candles as well as for cooking. I'm glad to know that I could use it for those purposes in case of an emergency, but think I'll stick to cooking with it myself.


So tell me - have you ever bought a share of a cow? And, if you have - did you save the fat for tallow? Do you think it's something you would ever consider doing?


OK...on to something else briefly. I want to give you a sneak peak of what's been keeping me so busy and away from my blog lately. Ready?


I'm linking up at Homestead Barn Hop, Monday Mania, These Chicks Cooked, Traditional Tuesdays, Teach Me Tuesdays, Fat Tuesday, Hearth and Soul Blog Hop, Simple Lives Thursday, and Real Food 101.

Wednesday, January 4, 2012

How to Season Cast Iron Cookware


This baby was my (requested) Christmas gift from my parents this year.  It's a whoppin' 9 quart cast iron Dutch oven.  And, let me just say...LOVE!  


When I told my mom that I wanted a cast iron Dutch oven, she asked if I wanted an enameled one. Although cooks the world over sing enameled cast iron's praises - I just wanted a plain ol' basic one. Nothin' fancy, just hard working. I wish I could get back all the money I've wasted through the years on cookware with lifetime warranties that have disappointed.  Without fail, I turn to my trusty cast iron skillets for cooking.  The only time I find I use one of my other types of cookware is if I don't have it in cast iron.  So, when my mom asked me what I wanted, I decided to go with what I know.


Here's what I love about this type of cookware.  It heats evenly, eliminating hot spots.  When properly seasoned (which we'll get to in a moment), it's non-stick.  It is uber-easy to care for.  Just as you have to be careful about cooking in aluminum because of the danger of it getting into your food, cooking in cast iron also infuses your food with iron - but in this case it's a good thing.  Unlike other cookware's often false claims of lasting a lifetime, I know that this stuff will last for generations.  And, the last thing that I love about this cookware is that it is so durable that it can even be used to cook in a fire. Camping anyone?  Actually, my family lived in Florida in 2004 when the state was bombarded with hurricanes.  We were just fortunate enough to live in a place where the eye wall of 3 of the 4 hurricanes hit our house. :0) The first storm left us without power for several days.  I was so thankful for my cast iron skillets during that time because I was even able to cook green beans on the grill.  I wouldn't have been as confident doing that with a regular sauce pan.


If you find cast iron cookware at a yard sale or thrift store it can be brought back to life even if it is completely covered in rust.  All you have to do is remove the rust with steel wool and then re-season it several times.  The only time you want to stay away from second-hand cast iron is if the metal is cracked.


Unless it comes pre-seasoned, new cast iron is grey in color.  It will turn black with seasoning.  So, just how do we go about seasoning cast iron?  Very simply.  


Rub the entire piece of cookware with oil.  I did both the pot and the lid on mine.  I used lard from the pastured pig we recently bought because A) I had it on hand, and B) it has a higher smoke point than many other oils.  I would stay away from olive oil, but coconut oil or tallow would be great.  And, honestly, though I don't use it anymore, for years I used plain old canola oil.


Put the oiled cookware in a 300 degree oven for an hour or two.


When it's done, rub it down with coarse salt.  That's it.  Honestly, sometimes I do the salt step and sometimes I just wipe off the excess oil with a paper towel.


The more you use cast iron the better it performs.  Since iron is a porous material every time you use it, more of the oil will saturate the pores creating a better non-stick surface.  It's like a fine wine - it just gets better with age. :0)


So, are you a fan of cast iron?  Have any pieces that hold a special history or story for you?  Do tell.  


Tomorrow I'll share the recipe that I tried out my new Dutch oven for the first time with. See you then!


I'm linking this post to Healthy 2day Wednesdays, Simple Lives Thursday, Homestead Barn Hop and Your Green Resource.

Tuesday, December 20, 2011

OK, y'all.  Today I need your help.  This past week I bought a new quilt and shams for our bed.  Both me and my husband loved the old coverlet.  It was very "us".  But, it was 6 or 7 years old and getting some discolorations on it that just wouldn't come out in the wash.  We knew it was time to move on.


old coverlet

I had to run into Kmart this past week and noticed that the quilt by Country Living that I've had my eye on every since they started carrying that line was on sale.  I was able to snag a king size quilt with matching pillow shams for $49.99. Yes!


Although you can't see it in this picture, it's really soft and textural and has a beautiful design stitched into it.


The reverse side has this light print with embroidery like the pillow shams in this picture.  It will be perfect for spring and summer.  


Here's a close up.  Ignore the dark spot that my camera loves to imprint into every picture. :0)

We are really happy with the new quilt.  As a matter of fact, I seem to be drawn to just about everything in Country Living's new home line.  It's also my favorite magazine.  I so look forward to every issue that comes.  Not that you care.  I'm just sayin'... :0)

Anyways, not one to waste - I now have a fabric from a king size coverlet, 2 king size shams and 2 valances.  Anybody have any ideas as to what I can transform all that material into?  I was kicking around the idea of cutting down the coverlet into a smaller throw.  Also, I switch all the red accessories from fall and winter out of my living and dining rooms every spring for light blues.  I could also go something along the lines of a table cloth.  But, being a novice sewer, I'm really open to ideas and suggestions at this point.  Any ideas for me?  Please?  :0)

Friday, December 16, 2011

En Lieu of a Card

I'd like to share something with you today that goes hand in hand with the post I did a couple of days ago about frugal gift wrapping.  This time we're talking about cards, though.  I actually got this idea from a blog post that I read about someone throwing a baby shower and asking that everyone bring a favorite, used child's book inscribed with who it was from instead of a card.  This would help build a library as well as be a lasting memento from friends and loved ones.  I can't remember which blog I saw this on, but if you recognize this, please let me know and I'll give due credit.  


As it just so happens, I have a friend who is due with her first baby any time.  With this idea in mind, I set out for Goodwill since my "baby" is long past the days of these sorts of books.  I didn't find any small books that jumped out at me, but found this gem.


For less than the price of a card I found this large storybook that was in beautiful condition.


This friend is pretty well set on baby items, so opted to get her a gift card which she could use for any odds and ends she needs for the baby, or to get something for herself once the little bundle gets here.  


I taped the gift card to the inside and inscribed it.  I will end up wrapping this or putting it in a recycled gift bag since I ended up doing things a little backwards.  But, I love the idea of giving (or getting) two gifts in one.


This got me thinking... You could actually apply this principle to any gift.  Christmas books for Christmas presents.  Any favorite book for birthday presents.  You could even do this for weddings or anniversaries with an appropriate marriage building or devotional book for couples.


If you've looked at the price of cards lately, well, you know they ain't cheap.  Books on the other hand can be found for a dime a dozen at yard sales, thrift stores and Goodwill.  And, if you're anything like me, you have hoards of them in your own stash to choose from.


So, tell me - have you ever inscribed a book en lieu of a card?  Do you have any other brilliant ideas along these gifting lines just waiting to be recognized?


I'm linking this post to Frugal Days - Sustainable Ways and Your Green Resource.