Showing posts with label Recipes. Show all posts

Friday, December 19, 2014

HERB INFUSED CIDER VINEGAR – A GREAT FOODIE DIY GIFT


I have this new addiction; salad. I know -weird, right? I mean, I’ve always liked salad, but now I actually crave it. I blame this herb infused cider vinegar recipe.
Did you know that flavored oils and vinegars are becoming a big thing? Like gourmet shops opening up with tasting rooms and everything kind of thing? While we were on vacation in southern Indiana last month, we visited one in Nashville called The Wild Olive. Check out some of the flavored vinegars they offer: Fig Balsamic, Jalapeno Lime White Balsamic, Maple Balsamic, Dark Chocolate Balsamic, and Garlic Cilantro Balsamic to name just a few. With my new love of salads I had to come home with a couple of bottles.
gourmet bottles
Check out these flavors.
gourmet close-up
The Lemongrass Mint is light and fresh while the Cranberry Pear is perfect for this time of year. Just imagine eating a salad that includes finely chopped pears, dried cranberries, walnuts and maybe some cubed Swiss or Feta cheese on a bed of mixed greens with this Cranberry Pear Balsamic Vinegar and a touch of oil on top. Is your mouth watering, yet?
We all know by now that any gourmet item comes with a gourmet price tag. For instance, a 250 ml bottle of the above vinegars costs $14.99 per bottle, while a 500 ml bottle comes in at $22.99. Granted, a little goes a long way. But you know what? You can totally make your own. I’ll let you in on a little secret…it’s REALLY easy. And fast. If you need a gift for the foodie in your life – this is your Huckleberry.
To continue reading hop on over to my new blog, Still Playing House. 

Thursday, May 24, 2012

My First Foray Into Wild Edibles

Every year when we put out our garden there is this certain weed that absolutely wants to take over. Last year we put straw down, which made a remarkable difference. We are going to do the same this year - probably this weekend. My husband has tilled in between the rows in the meantime to keep the weeds under control. But, this weed is still cropping up in the rows where our veggies are growing.

Then, a few days ago I  read this blog post from New Life on a Homestead about a common garden weed. MY common garden weed. Turns out that it isn't a weed after all. It's actually a super food called purslane. Go figure. 

I'm starting to realize that many of the plants that we consider weeds are actually some of the most nutritious foods on the planet. 


Take the lowly dandelion, for instance. That little plant is the nemesis of every man who desires a green lawn in the nation. But, it's actually very good for food. It's leaves can be eaten raw in salads or cooked many different ways. It's roots can be roasted and ground up and brewed as coffee. The flowers are also edible and are supposed to be a favorite when battered and fried. Though I've never eaten (or drank) it, I hear it is really yummy. It's also a powerhouse of nutrition that is fantastic for your liver, among other things.

But, we're talking about purslane today...


(from plantphotos.net)

This is what www.plant.photos.net says about purslane:

...also called Summer Purslane - purslane usually grows spread out flat on the ground. It can be found growing in almost any unshaded area, including flower beds, corn fields, and waste places. Purslane can be found growing in cold climate areas (e.g., Canada) as well as warm areas (e.g., the Caribbean).
Medicinal Uses:

Verdolaga is also valued in Latin America for its medicinal properties. Purslane contains more Omega-3 fatty acids than any other leafy vegetable plants, and may have positive effects on the brain and may aid in such conditions as depression, bipolar disorder, Alzheimer's disease, autism, schizophrenia, attention deficit disorder, hyperactivity and migraines. For other medicinal uses see: http://www.ansci.cornell.edu/plants/medicinal/portula.html#efficacy

American Indians used the plant as a poultice for burns, juice for earaches, tea for headaches and stomachaches.

Pretty cool, eh?

It's also an excellent source of vitamins A, C and E and the essential amino acids. So, I figured that I needed to try this wonder food. Crab cakes were on the menu for the night and I don't have any of the parsley that I usually put in it, yet. So, I thought it would be a great night to try the purslane. I went out the garden and pulled some of it, washed it really well in water and then spun it dry in my salad spinner.  


Since it can be eaten cooked or raw, I tasted one of the leaves. It has a very mild, but tasty flavor. It is supposed to be very similar in taste and consistency to watercress, but I've never eaten it so I can't vouch for that fact.
For my crab cakes, I simply cut the roots off and added the amount I needed to the food processor, stems and all. They're edible, too. Next, I added the rest of my ingredients to the food processor to finish chopping and mixing everything together.

Evidently, purslane is also a very popular salad green in Europe. Considering we were having salad with our dinner (and I've been buying the el cheapo bagged iceberg lettuce lately) I picked off the leaves of some more of my purslane and added to the salad mix to bump up the nutritional value of my otherwise pretty nutritionless bagged salad.


Not only is it tasty, but it's pretty, too. :-)


All in all, I really liked the purslane and will definitely use it again.
You probably realize this, but I'm going to mention it anyway. Don't eat wild edibles from places that are likely to have been sprayed with pesticides or that grow too close to the road where they would be covered in exhaust fumes. I felt confident using the purslane from my garden because we don't spray. We've actually found that our garden seems to do better than most people's in our area and I think it's because we leave it alone and try to build the soil quality every year. Healthy soil makes for healthy plants.
I'm amazed at how many wild edibles that we have around us and are clueless about. I would really like to start learning more about them. It just so happens that Wild Cards is a deck of cards that has pictures and information on 52 different wild plants that you can eat. It includes information on where each plant is found, how to cook it and its medicinal uses. I really need to get one of those decks.
So, tell me - have you ever eaten weeds?

I'm sharing this post with Wildcrafting Wednesday.

* UPDATE: I have had a couple of people tell me that the link to the Wild Cards took them to an, um, unsavory website. I apologize for that. On my Mac it took me right where it was supposed to. In an effort to fix the problem I changed the link. Please, let me know if it is still not working right and I will just remove it altogether and you can just google it for yourself. ;-) Thanks, y'all!

Thursday, April 5, 2012

Making Homemade Beef Stock

My family bought half of a grass-fed cow this winter. I asked the processing plant for the bones and any extras they had. Now, I'm a veteran at making homemade chicken stock, but this was to be my first foray into beef stock. We put the huge bag of bones into the freezer to wait until I had room in the freezer to make stock. You see, we also bought a pastured hog that came in about 6 weeks before the beef did. That meant my freezer was full. to. the. max. Since, I had 200 thousand pounds of bones, I was going to need to freeze the resulting stock so it wouldn't spoil. Of course that was going to take up precious freezer space that I just didn't have until we ate some more meat.


When I knew that time was getting close for me to make stock we took the big bag of bones out of the freezer and set it on the garage floor to wait for me. I live in Indiana and it was winter time so this should have been no problem. Clue in on key word should. Let me rephrase...In a typical winter this should not have been a problem. Clue in on key words typical winter. In case you just flew in from Mars or something...this has NOT been a typical winter. No. We had to have a warm snap. Like, even warmer than our unusually warm winter snap. I couldn't get those bones out of the garage before they quickly spoiled because of the heat. GRRRRRR! Needless to say, I was NOT a happy camper. Lesson learned...


I still wanted to make beef stock, though. Bone broth is one of the healthiest foods you can consume and I am over buying an inferior product if I don't have to. Guess what I found out? You can actually buy the bones from a butcher many times. Meijers (a superstore in the Midwest) even sells them. So, I bought me some bones and made beef stock. Wanna learn?


First, you need to get some bones. I started by saving all the beef bones that came in our roasts and off of our steaks in a gallon sized bag in the freezer.


Then, I bought some soup bones at Whole Foods.


And last, but not least...I snatched up this baby to throw in for good measure. :0)


It's a cow hoof. The hard part has been taken off and it's been cleaned, of course.


I thought you might like a close up. You're welcome. :) These are really great for making stock because they're full of the substance which causes stock to gel. You want that. It's super good for your joints as well as your immune system.


I think I freaked the lady out behind me in the check-out lane at Meijers when she saw this on the conveyor belt. Our conversation went something like this...


- Excuse me, what is that?
- A cow hoof.
- What are you going to do with it?
- Make dinner.
- voice begins to raise... Exactly WHAT are you making with it?
- voice remains calm and nonchalant... Braised cow hooves with liver meatballs. It's cooked with lots of garlic and onions, which makes everything taste wonderful. It's really good for you.
- voice is near panicky and about 5 octaves higher... OH. MY. GAAAWD! How can you EAT that?


Naw, I didn't really say that to her. But, I totally would have if I was on-the-spot witty. Unfortunately, I usually come up with some real zingers, but it's always after the fact. :) This is how our conversation really went...


- Excuse me, what is that?
- A cow hoof.
- What are you going to do with it?
- Make beef stock.
- Oh?
- Yeah, they're great for making stock because they produce a lot of the gel that is so good for building your immune system and joints.
- Well, that makes sense. I just wouldn't want to see one show up on my dinner plate!


It wasn't until I hit the parking lot that I realized I could have had a really great time messing with her. Oh well, there's always next time. :)


You probably want to know how to finish making stock now so I'll get off of my bunny trail.


After I gathered all of my respective bones, I put them in my favorite 9 quart iron Dutch oven. I give you permission to use whatever you want, though. I'm nice that way. Then I added some flavor and nutrient enhancers.


This part is really flexible, but I added carrots, onions and garlic. They make the broth taste yummy and give a real boost to the immune system. I also added bay leaves, because bay leaves make everything taste better. The dried stuff you see in the picture is parsley from last year's herb garden. If you ever plan on planting parsley in your herb garden make sure to get the Italian parsley. Don't even bother with the curly stuff - unless you like to put a snippet of it on the side of your dinner plates for everyone to throw away. Then, by all means, knock yourself out. I won't judge you. Anyhoo...I also added sea salt and pepper for good measure. As far as flexibility goes, you can throw in celery, leafy greens like kale or collards, any herb you have on hand (think thyme, chives, sage...), the occasional potato peel, etc. I've even been known to throw in a few asparagus stems, though you would want to go easy on that. They have a pretty strong flavor when cooked for a long time and can quickly overwhelm the broth. You want the main flavor to be the animal the bones came from, not asparagus. Know what I mean?


A quick tip if you're going to start making bone broth, beef or chicken, is this: If you're going to peel carrots for something, wash them first and then save the peels in a zip lock bag in the freezer. You can also save onion and garlic skins, the tips of celery or the ends of any veggie that you would normally send to the trash or compost bin as long as you wash them first. This also applies to the stems of soft herbs. Then, when your bag of frozen veggie scraps is full just add it to your bones for broth. The scraps are still full of nutrients and flavor. Even though they're not fit for showcasing in a meal they're perfect for making broth and you didn't have to waste a vegetable in the meantime.


Here's another quick tip for you. Don't mess with peeling and chopping the garlic. I simply smash them with the side of knife and throw them into the pot skins and all. I KNOW.. so much easier! You're welcome.


Once you've decided on add-ins, or not, just cover with water. I mean...JUST. You don't want inches of water over the tops of your bones 'n veggies. Kapeesh?


Now, this next step is optional but highly recommended. Add 1 or 2 tablespoons of cider vinegar to the water and let it sit for about 30 minutes before you turn the heat on. The cider vinegar begins to break down the bones so that inner substance that forms the gel that is so good for you can be released.


After about 30 minutes turn the heat on medium high and bring to a boil. Skim off any foam that forms and then turn the heat down to med low. Cover your pot. You want a gently bubbling simmer, not a boil. That's it! 


Don't let the details of this post fool you. It takes mere minutes of hands-on time to get to this point. From here on out you barely even have to think about your broth, much less touch it. So, though there is a lot of time involved, there is very little hands on time involved. It's brainless, really. And...it smells SO GOOD your husband will go nuts when he gets home from work. I'm talkin' 'wake you up in the night 'cause it smells so good' good here. Moving on...


Ideally you want to let your stock simmer for 24 hours before you strain it. But, you can let it go even longer if you like. I wouldn't strain beef stock any sooner than 18 hours, personally. Chicken stock can be removed after 8 or 12 hours if you need to. The beautiful thing about making your own stock is that you can make it in a crock pot if you're uncomfortable with running your stove top for that long at a time.


Another tid bit of information is that your bones can be reused. Remove the veggies after each batch if you're using them. Chicken bones can be used 2 or 3 times. Beef bones can be reused up to 5 times. Now, each batch of broth is going to be weaker than the one before. The first batch of stock is superb, unequaled to store bought even, and is best used where the flavor is going to be featured. Think soups, sauces, etc. The later batches which are less flavorful are great for cooking anything that would normally just use water. Think rice, risotto, steaming veggies, yada, yada, yada. Although you don't get the awesome flavor, you're still getting extra nutrients.


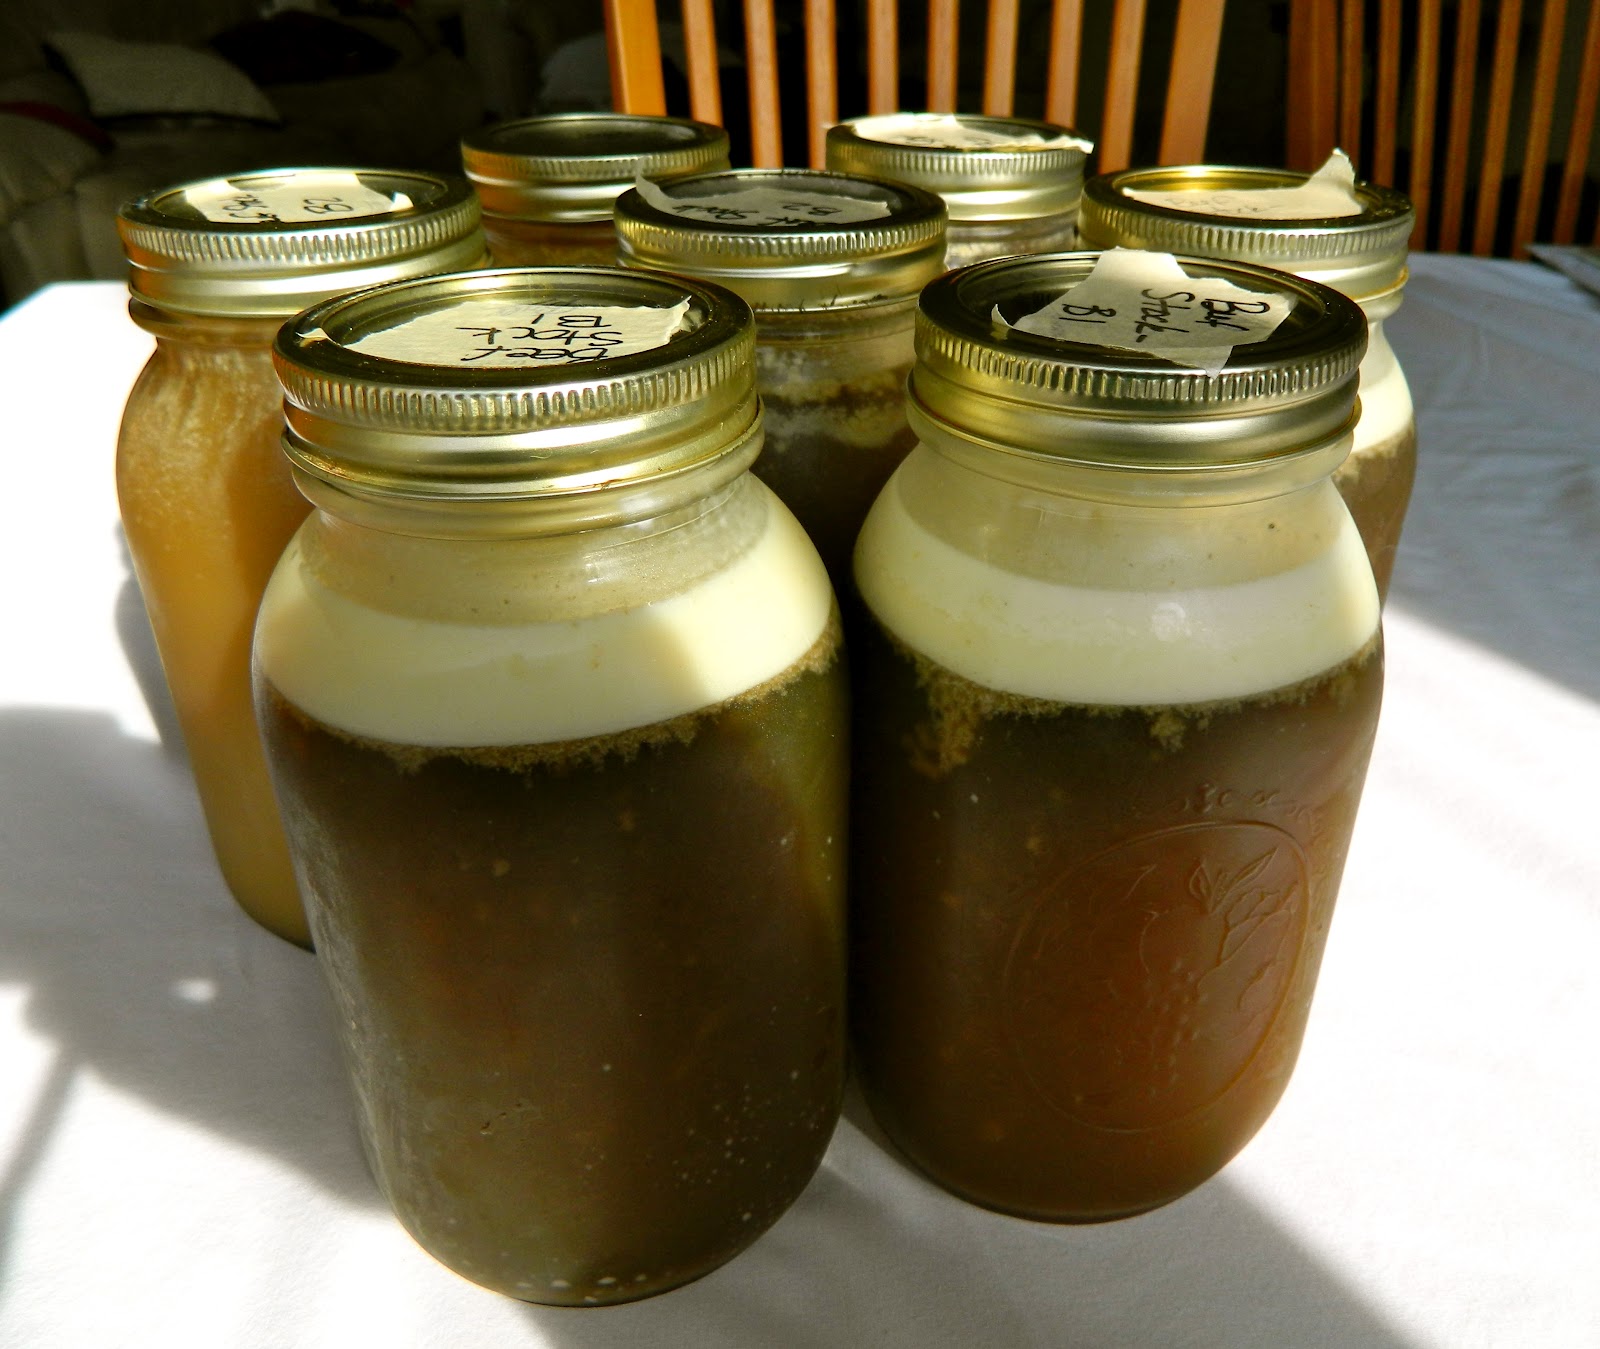
When my stock was done, I poured it into mason jars through a cheesecloth.


Once it's cool the fat will rise to the top. You can scoop it off if you wish. Or, you can scoop it off and save it separately to use in cooking because what you have there is tallow - a traditional, healthy fat. You can see that the jars in the back look different than the jars in the front. They don't have that dark, rich color because they were from a later batch of beef stock. It'll be perfect for cooking rice or something like that in.  


All in all, I ended up with 7 quarts of beef stock. I can live with that. :0 I'm not lying when I tell you that the flavor of store bought broth in no way, shape or form comes anywhere near the flavor of homemade stock. The difference it makes in the flavor of your meals will amaze you once you try it.


You can go here for a tutorial on how to make chicken stock and a few more tips about packaging and storing broth in general.


So, do tell...Have you ever made your own stock before? Is this something you think you would ever do? Any more ideas on what to do with the later batches of stock that don't have as rich of a flavor?

Monday, January 30, 2012

Rendering Tallow


Well, I finally got a huge job that had been looming large over my head finished. I got all the fat from the 1/2 side of grass-fed beef that we bought rendered into tallow. It amazes that 1/2 of an entire cow only had six and a half quarts of fat on it. 


I basically followed the same procedure as when I rendered lard a couple of months ago, except I did it in a bit lazier way. Instead of chopping all of the fat into 1" pieces, I simply put the slabs of fat into my containers whole. They were pretty large and I just didn't have space to chop it.


Both crock pots and my 9 quart Dutch oven were completely full of beef fat. I set both crock pots and the burner on my stove to low and let them be.


As the fat began to melt, I strained it into quart jars through a cheese cloth. Eventually I was able to add the fat from the red crock pot to the Dutch oven to save counter space.


These pictures show the liquefied fat during the melting process. This is what I pulled out with a ladle and strained into jars. I kept at this until there was no more fat to be rendered.


The fat in the crock pot was finished first. Here you can see the hard bits left over after the fat was completely liquefied. I need to mention that this makes your house smell like heaven while it's cooking. The bits of meat that are left on the slabs of fat when the cow is butchered are irresistible to certain meat-loving husbands, too. :0)


The Dutch oven still had a way to go by the time the crock pot was finished. This could have been because it was so much larger. I actually preferred this pot because the cast iron is wonderful at holding in heat evenly, allowing me to use a lower temperature to render the tallow. This is preferable, in my opinion.  


All in all, it took 3 days for all of the fat to be rendered into tallow. There was very little I had to do during that time, besides occasionally ladling the fat into jars. It may have taken less time had I cut the fat into smaller pieces before I started. Since I didn't really have room for that and wouldn't have to touch it much while it was working it's magic anyway, I just didn't see the need for that extra step.


Now I have six and a half beautiful quarts of a traditional, healthy fat to cook with in addition to the lard I have left. Although, this took a long time - it took very little effort.  Even the clean-up was a breeze. After I emptied each crock pot and the Dutch oven, I filled them with water and let the water heat in them for a while. This pulled almost all of the fat residue off the sides and bottoms of the pots. I then dumped the water and washed as usual. There was no problem with bits and pieces stubbornly sticking to it.


Traditionally, tallow was used in soap-making and for candles as well as for cooking. I'm glad to know that I could use it for those purposes in case of an emergency, but think I'll stick to cooking with it myself.


So tell me - have you ever bought a share of a cow? And, if you have - did you save the fat for tallow? Do you think it's something you would ever consider doing?


OK...on to something else briefly. I want to give you a sneak peak of what's been keeping me so busy and away from my blog lately. Ready?


I'm linking up at Homestead Barn Hop, Monday Mania, These Chicks Cooked, Traditional Tuesdays, Teach Me Tuesdays, Fat Tuesday, Hearth and Soul Blog Hop, Simple Lives Thursday, and Real Food 101.

Wednesday, January 18, 2012

Gluten Free Pasta with Beans & Greens in a Creamy Lemon Sauce

Do you ever have days where you're, well, just hungry? You know, when cheese and an apple isn't going to cut it? You feel like you need something with some nourishment? That's how it was for me around lunchtime a couple of days ago. I didn't want to spend a lot of time cooking lunch, though. Quite honestly, I didn't think I really had anything other than a can of soup to even make for lunch. But, I started rummaging through the fridge and cabinets and found a few ingredients that I thought I might be able to turn into a decent meal. Necessity is the mother of invention, right?


Let's do the math...


(*Gluten-free Quinoa pasta, garbanzo beans, kale, lemon, Parmesan cheese and butter)

PLUS+

(half & half, salt, pepper and red pepper flakes)

EQUALS=

YUM!!!

*Let me give you a heads-up on g-free pasta... The rice pasta is not very good. It cooks up all gummy and nasty. This Quinoa pasta is awesome! You'd never know it wasn't regular pasta. It also comes in different shapes like rotini twists and macaroni elbows. I use that to make homemade mac & cheese. Corn pasta is also very good. And, if you live near a Trader Joe's, their corn pasta is only $1.50 a pack. That is awesome pricing for gluten-free pasta. Moving on...

This meal is an excellent example of why it's a good idea to have a decently stocked pantry. Even when you're in a pinch you can come up with something good. :0)

Here's how to make it:

Get water boiling and pasta cooking.

In the meantime, melt about 2 Tbsp. of butter in a skillet and begin cooking kale (or whatever green you have on hand) over med-low heat. This is the last of the kale from my garden and I probably only had about a cup.  I would have used more if I'd had it. You use as much as you like.

Once the greens have cooked for about 5 minutes, add your drained and rinsed chickpeas. Once again, this is the only bean I had on hand. Great northern beans would be excellent. But, use what you have. The key is to get some protein in there.

When the past is close to being done, add a few red pepper flakes (or a lot) to the beans and greens and salt and pepper it. If it looks dry, add about another tablespoon of butter. Next add about 3 ounces of half & half, cream or milk and give it a good stir. You want to give it enough of a sauce to coat the pasta without having it swim in it.

Drain the pasta when done.  Toss with the beans and greens mixture.  Squeeze the juice of one lemon over it and top with some Parmesan cheese.  Adjust seasoning if necessary.

Oh. My. Goodness.  This was so good!  Isaac's kept saying, "Mmmm.  Mmmmm.  This is so good.  Thank you, Mama." the whole time he was eating it. That makes this Mama's heart happy.

So, the next time you need some soul food, take a gander at your pantry.  You just might have more to cook than you realized.

Do you ever find yourself cooking on the fly?


I'm linking this post at These Chicks Cooked.

Tuesday, January 17, 2012

STUPID EASY GLUTEN-FREE TRAIL MIX


Since we've had to go gluten-free, it's been a little difficult to find snacks to keep on hand. This trail mix fits the bill and is stupid easy. A child could do this 'cause there's no cooking what-so-ever.  Just open, dump and mix.

1 bag banana chips (Trader Joe's is $.99)
1 bag almonds
1 bag sunflower seeds
1 bag dried cranberries, or fruit of your choice
1/3 - 1/2 box of Chex cereal
medium size bag of plain M&Ms

You could also throw in other nuts or gluten-free pretzels, if you like.

Once you dump everything in a bowl, all you need to do is stir it up and put it into containers like these mason jars, or plastic bags.  Stupid easy.

It's great to have on hand for a quick snack or to take with you if you're going to be on the go.

Not only is it easy - it's really good!

So, do you have a quick go-to snack option?

P.S. There's still time to enter to win a free copy of Jacinda Vandenberg's new e-book, "Blog Design on a Dime"!

I'm linking this post up with Teach Me Tuesdays and These Chicks Cooked.

Thursday, January 5, 2012

vegetable beef soup

Double, double toil and trouble;
Fire burn and cauldron bubble.
Shakespeare ~ from Macbeth


Yesterday I showed you my new cast iron Dutch oven and how to season it.  Today I want to share with you an old stand-by recipe that I made in it.  When I was growing up, Saturday's were marked by a huge pot of some sort of soup or chili on the stove.  As various family members or friends dropped by the house, there was always plenty to share. This is one of those recipes. It's one of those soups that I turn to all the time when the cold weather sets in. Keep in mind that if you don't like an ingredient you can skip it.  You can also add more of something that you love - or add another ingredient that you think would be awesome.  This is just a guideline.


Vegetable Beef Soup and Gluten-free Cornbread


VEGETABLE BEEF SOUP


2 pounds stew beef
1 medium to large sized onion, chopped
3 stalks celery, chopped
3 large carrots, peeled and sliced
2 cloves garlic, minced
4 potatoes, washed and diced
1 quart green beans, drained
1 cup red wine, optional
1 large can (49.5 oz) beef broth
salt and pepper
thyme


How to:


Heat your pot with some oil on med-high heat. I used lard. Once it's nice and hot, add your stew beef. Brown it on all sides, by stirring occasionally. Next, add your onion and garlic and just a bit of salt and pepper. If you add the salt and pepper in stages, the soup will have a richer flavor because one ingredient won't taste flat.  


Once the onion starts to become translucent, add the wine if you're using it. If not, use 1 cup of your broth. Although the wine is optional, I feel it really adds a depth to the flavor that you won't get otherwise. Turn your heat down to medium and let cook for about 5 minutes while you prepare your other vegetables. As they're cleaned and chopped, add the celery, carrots and potatoes in that order. Add the rest of your broth, cover and simmer until the carrots and potatoes are tender.  


Once your veggies are done, add the green beans. Taste the broth and add bit more salt and pepper and some thyme. I didn't measure the thyme, but I would start with a couple of teaspoons for this amount of soup. Let the soup simmer for about another half hour to marry the flavors. Just before serving, taste the broth and adjust the seasonings again, if necessary.


Notes:


It's better to add seasonings a bit at a time. You can always add more, but can't take it out if you add too much.  


This is a huge batch of soup. I feel it's better to make more and then have extra to freeze for lunches or another dinner because it's no extra work. If that's not your bag, cut the recipe in half.


If you don't have a garden and can your own beans, use two cans of store bought beans instead.


Sometimes I add corn to this. You could also add parsnips, green pepper, mushrooms or any other veggie you love. Also, you could add rice, barley or noodles to the broth at the time you add your green beans.


If you make steak, roasts or ribs - save those bones and make your own beef stock. Not only will it save you $$, it doesn't get any more nutritious than homemade bone broth. We just bought a grass-fed cow and I have a freezer full of bones that I will be using to make lots of broth with with the next week or so. Unfortunately, I didn't have it ready for this pot of soup.


Do you have a favorite soup recipe that you turn to all the time?


I'm linking up with Simple Lives Thursday, These Chicks Cooked, Cast Party Wednesday and Homestead Barn Hop.

Tuesday, January 3, 2012

Kickin' Crab Dip

I'm baa-aack!  I feel like I've been gone for stinkin' ever!  I had a wonderful extended stay with my family in Michigan over Christmas and the New Year.  My entire family spends Christmas Eve together and then Christmas Day is a little more intimate at my sister's house with both of our families, our parents and her in-laws.  I was able to get in some quality 'cousin' time during the week.  Then, New Year's Eve is always a big bash with the entire family and friends that also qualify as family.  It was really nice.  I haven't been able to be a part of the New Year's Eve shin-dig since I was a teenager.  Isaac was overjoyed to be saturated with cousins for a week and a half.  And, he still wasn't really anxious to get home. :0)  My hubby had to come home to his J.O.B. during the week, but still had two long weekends up there.  Though I missed him during that time, it was still nice to log some family time. I hope you had a wonderful Christmas and New Year as well!  


I'm ready to get back into the swing of things here on the blog.  I have a couple of exciting things in the works that I'll share as the time comes.  But, I'm going to be working my buttocks off on one of them in particular over the course of the next 4 to 6 weeks to get it going.  I'm really stoked about it and can't wait to share it with you!  But, enough about that.  Today I want to share a recipe with you.


This is a crab dip that is so creamy and yummy.  It's really easy, especially if you have a small crock pot.  Although, it would be perfect for gatherings like Christmas and New Year's Eve, eh-hem (slightly late for that), it would still be great for something like a game night.  I've even made it as a snacky lunch.


KICKIN' CRAB DIP


2, 8 oz. blocks cream cheese
2 sticks of butter
1/4 c. chopped green onion
6 oz. can of mushrooms, drained and chopped
1 pound of crab meat, finely chopped (can be imitation)
Tony Chacheres Original Creole Seasoning, to taste


My original recipe says to melt the cream cheese and butter on low in a small sauce pan, then to add the rest of the ingredients and allow to meld together for 15 minutes.  That is certainly fine.  But...I find it much easier to just throw them all together in a small crock pot and let it do it's thang. :0)  


Once it's all nice and melty (some of the butter will float on the top), stir it and serve it up with French bread, toast points or your choice of crackers.  This stuff is so good it would be awesome served over top of pasta for a hearty meal as well.


NOTES:


This recipe can easily be halved for a smaller amount.


Although I left a link for the Tony Chachere's seasoning, it is usually carried in the spice isle at the grocery store.


Since my family has had to go gluten-free, I was thrilled to come across these crackers.  I first spotted them at Whole Foods, but have even seen them at Meijers.  I think any store that has a semi-decent selection of gluten-free products would carry them.  And, they also come in several different flavors.


Happy 2012, y'all!

I'm linking this post with Teach Me Tuesdays and These Chicks Cooked.